Resource Quotas in KKP allow administrators to set quotas on the amount of resources a subject can use. For now the only subject which is supported is Project, so the resource quotas currently limit the amount of resources that can be used project-wide.
The resources in question are the resources of the user cluster:
- CPU - the cumulated CPU used by the nodes on all clusters.
- Memory - the cumulated RAM used by the nodes on all clusters.
- Storage - the cumulated disk size of the nodes on all clusters.
- Accelerators (alpha) - the cumulated KubeVirt VM accelerator devices across all clusters in an activated project.
This feature is available in the EE edition only.
Note: Do not confuse with the Resource Filter setting in the Defaults And Limits admin panel page.
That one just controls the size of the machines suggested to users in the KKP Dashboard during the cluster creation.
Setting up Resource Quotas
The resource quotas are managed by administrators either through the KKP UI/API or through the Resource Quota CRDs.
Example ResourceQuota:
apiVersion: kubermatic.k8c.io/v1
kind: ResourceQuota
metadata:
  name: project-tjqjkphnm6
spec:
  quota:
    cpu: "100"
    memory: 500G
    storage: 350G
  subject:
    kind: project
    name: tjqjkphnm6
The quota fields use the ResourceQuantity to represent the values. One note is that CPU is denoted in single integer numbers.
Setting up Resource Quotas with UI
Administrators can create a resource quota for a project from the admin panel.
-
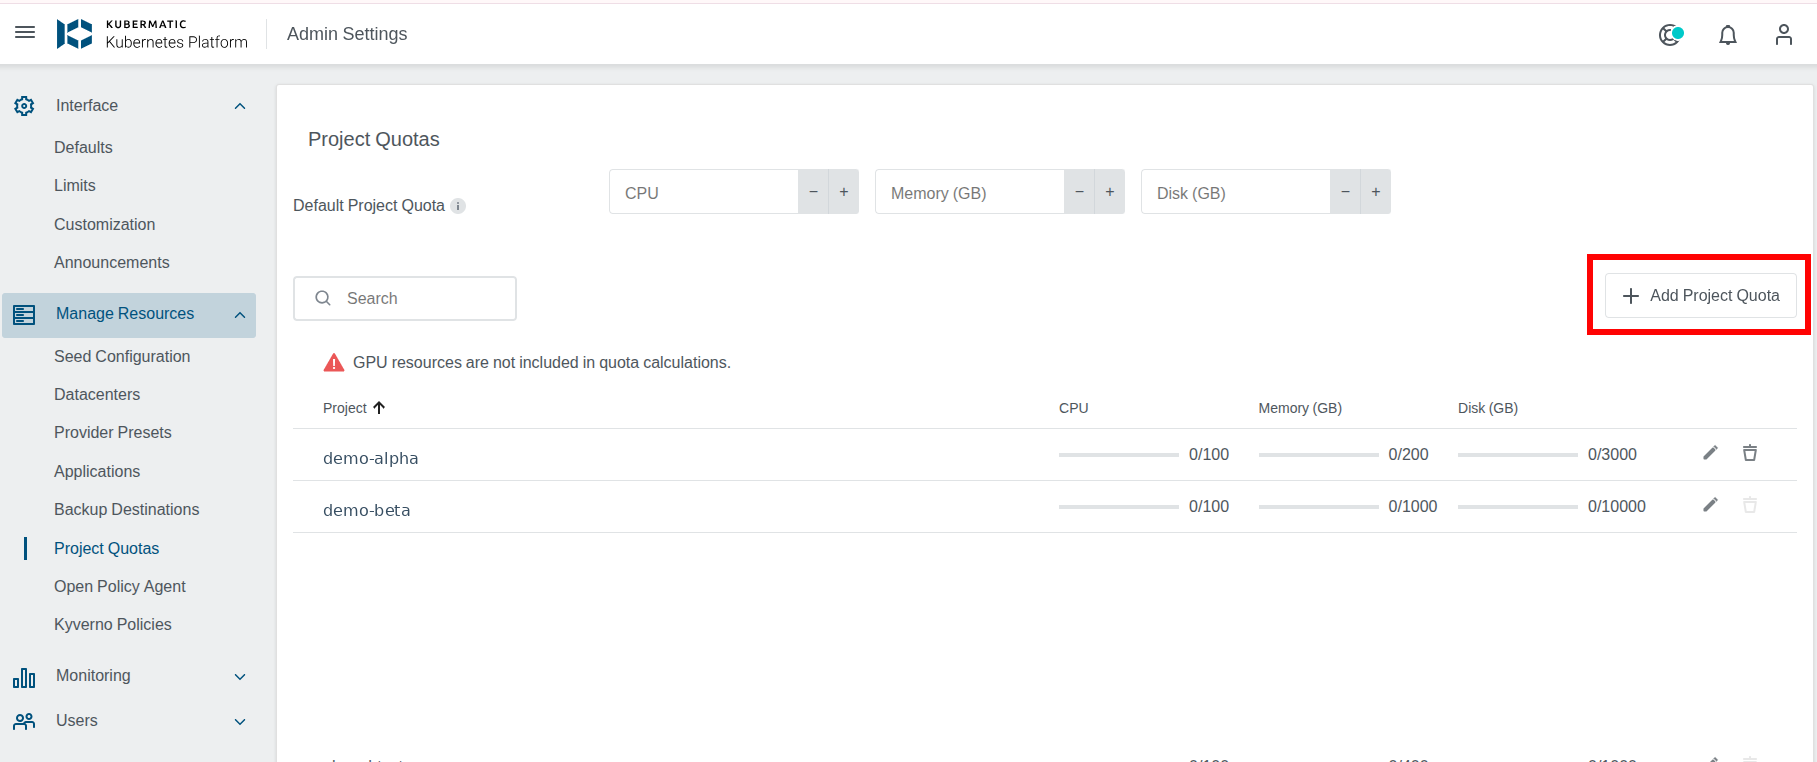
Navigate to Admin Panel > Manage Resources > Project Quotas. The list of the existing project quotas is shown on this page.
-
Select Add Project Quota to open the quota dialog.
-
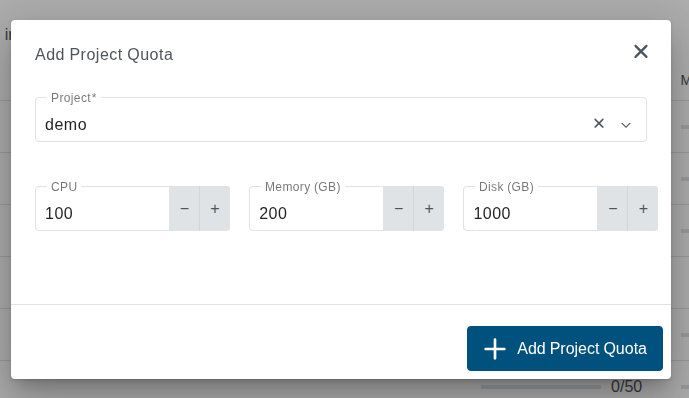
Choose the project the quota applies to, then set the CPU, Memory and Disk quota.
-
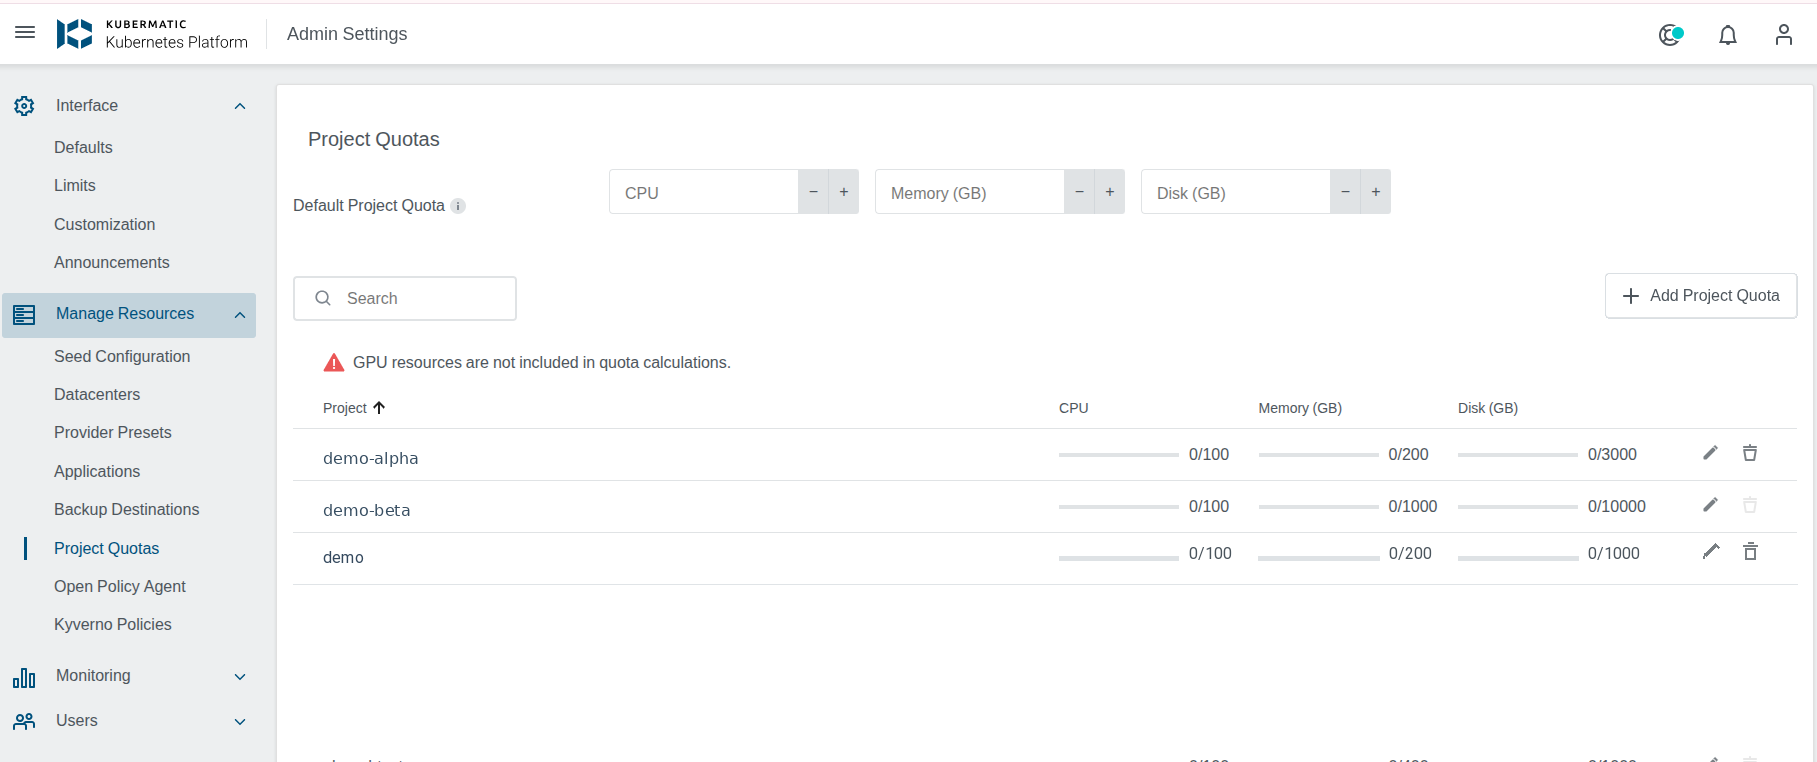
Select Add Project Quota. The new quota is then shown in the project quotas list.
-
To change an existing quota, select the edit (pencil) action in its row, update the CPU, Memory or Disk values and save the changes.
To simplify matters the UI uses GB as representation for Memory and Storage. The conversion from any value set in the ResourceQuota is done automatically by the API.
Calculating Quota Usage
The ResourceQuota has two usage fields in its status:
globalUsagewhich shows the resource usage across all seedslocalUsagewhich shows the resource usage on the local seed
apiVersion: kubermatic.k8c.io/v1
kind: ResourceQuota
metadata:
  name: project-tjqjkphnm6
...
status:
  globalUsage:
    cpu: "2"
    memory: 35G
    storage: 127G
  localUsage:
    cpu: "1"
    memory: 17G
    storage: 100G
Each seed cluster has a controller which calculates the localUsage by calculating the Machine resource usage
across all the user clusters that belong to a subject (for now only project).
The master cluster has a controller which calculates the globalUsage by adding up all localUsage across the Seeds.
The Machine(Node) resource usage is calculated depending on the provider in question, the table below shows
some details from where the resources are taken. The goal was to have the calculated resource the same as the
resulting K8s Node .status.capacity.
| Provider | CPU | Memory | Storage |
|---|---|---|---|
| Alibaba | CpuCoreCount (query to provider) | MemorySize (query to provider) | Set in Machine spec by user |
| AWS | VCPUs (loaded from AWS instance lib) | Memory (loaded from AWS instance lib) | Set in Machine spec by user |
| Azure | NumberOfCores (query to provider) | MemoryInMB (query to provider) | Set in Machine spec by user |
| DigitalOcean | Vcpus (query to provider) | Memory (query to provider) | Disk (query to provider) |
| GCP | VCPUs (query to provider) | Memory (query to provider) | Set in Machine spec by user |
| Hetzner | Cores (query to provider) | Memory (query to provider) | Disk (query to provider) |
| Openstack | VCPUs (query to provider) | Memory (query to provider) | Disk (query to provider) |
| KubeVirt | If flavor set: calculate from the provider flavor, otherwise get from the Machine spec | If flavor set: calculate from the provider flavor, otherwise get from the Machine spec | Add up Primary and Secondary disks (from Machine spec) |
| Nutanix | CPU * CPUCores (Machine spec) | MemoryMB (from Machine spec) | DiskSize (from Machine spec) |
| vSphere | CPUs (set in Machine spec) | MemoryMB (from Machine spec) | DiskSizeGB (from Machine spec) |
| Anexia | CPUs (set in Machine spec) | Memory (from Machine spec) | DiskSize (from Machine spec) |
| VMWare Cloud Director | CPU * CPUCores (Machine spec) | MemoryMB (from Machine spec) | DiskSizeGB (from Machine spec) |
Enforcing Quotas
The quotas are enforced through a validating webhook on Machine resources in the user clusters. This means that the quota validation takes place after the MachineDeployment is created, and if quota is exceeded, the creation of the Machines(Nodes) will be blocked.
Users can observe the quotas being enforced (with a message stating why) on the User clusters Machine Deployment, in the form of Events.

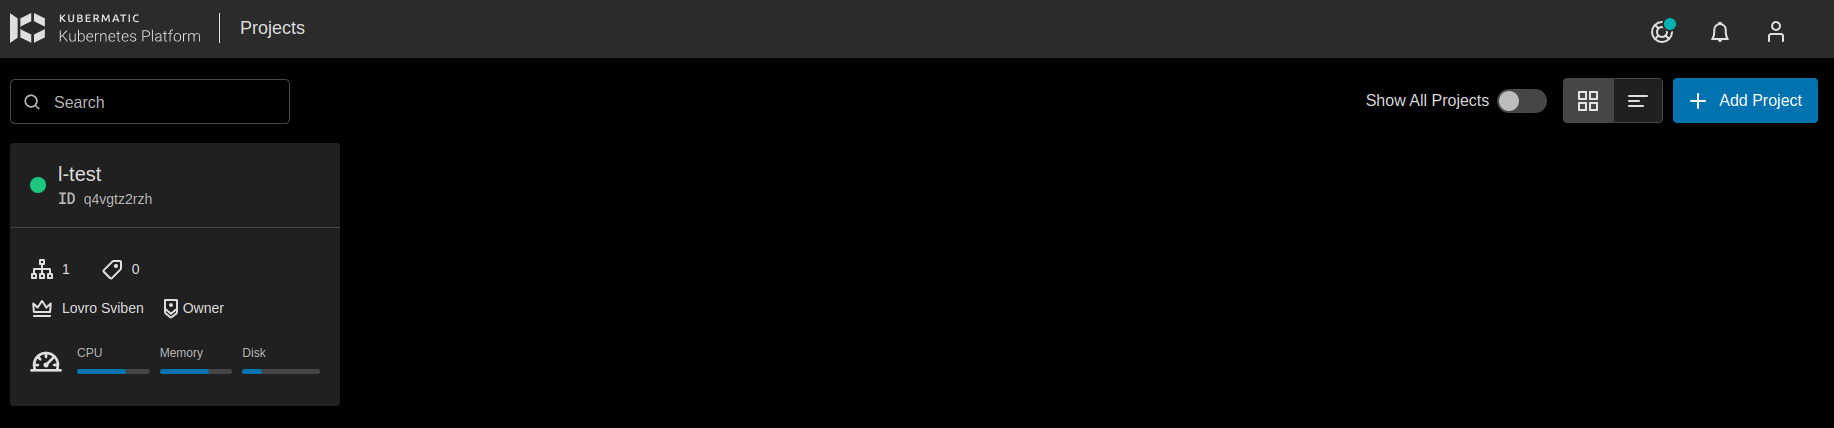
Furthermore, a project quota widget of the active project is visible in the dashboard, which shows what is the quota usage.
KubeVirt Accelerator Quotas (Alpha)
KubeVirt accelerator quotas add provider specific GPU and host device limits to project ResourceQuotas. KKP aggregates the devices requested by KubeVirt Machines across user clusters and Seeds, then enforces the project limits when new Machines are created.
This feature is alpha, available only in Kubermatic EE, and disabled by default.
Enable the Feature Gate
Enable the KubeVirtAcceleratorQuota feature gate in the KubermaticConfiguration:
apiVersion: kubermatic.k8c.io/v1
kind: KubermaticConfiguration
metadata:
  name: kubermatic
  namespace: kubermatic
spec:
  featureGates:
    KubeVirtAcceleratorQuota: true
The feature gate makes accelerator accounting available, but it does not activate projects. Activate each project through its ResourceQuota.
Activate Accelerator Accounting for a Project
Activation requires an existing, explicitly managed project ResourceQuota with an absent or empty
spec.quota.accelerators list. Activation cannot be part of ResourceQuota creation. If the quota is a default one, override it
in a separate update first.
For the initial test, use a dedicated project, for example Data Science. Accelerator accounting is activated independently for each project.
Use the Dashboard
Accelerator quota can only be enabled on an existing project quota, it cannot be enabled while the quota is being created. So the project needs a quota first, which is then edited to enable the accelerator quota.
-
Create a project quota for the project, as described in Setting up Resource Quotas with UI.
If the project already has a Default quota, accelerators cannot be enabled on it as long as it is a default one. Select its edit (pencil) action, change a CPU, Memory or Disk value and save it. This removes the default label from the quota and makes it an explicitly managed one.
-
Select the quota’s edit (pencil) action, enable Enable Accelerator Quota, and select Save Changes.
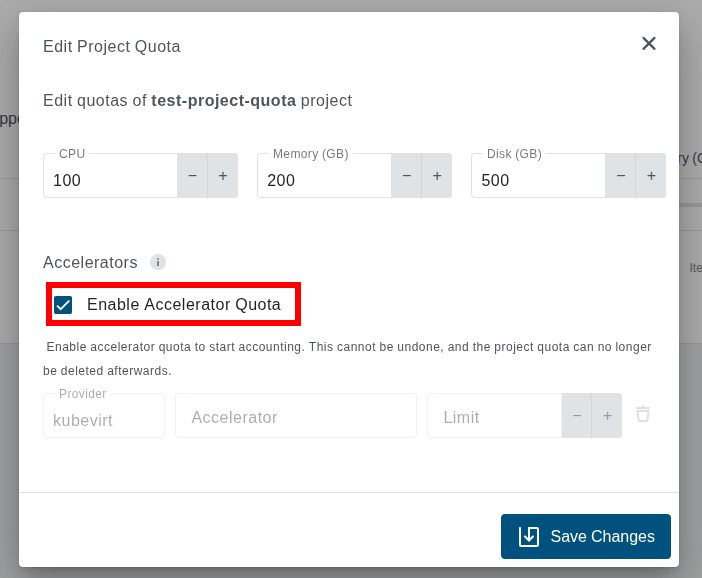
Enabling the accelerator quota cannot be undone, and the project quota can no longer be deleted afterwards.
-
Wait until the Accelerator column shows the
Readystatus before adding limits. The column’s status icon and its tooltip show the current phase.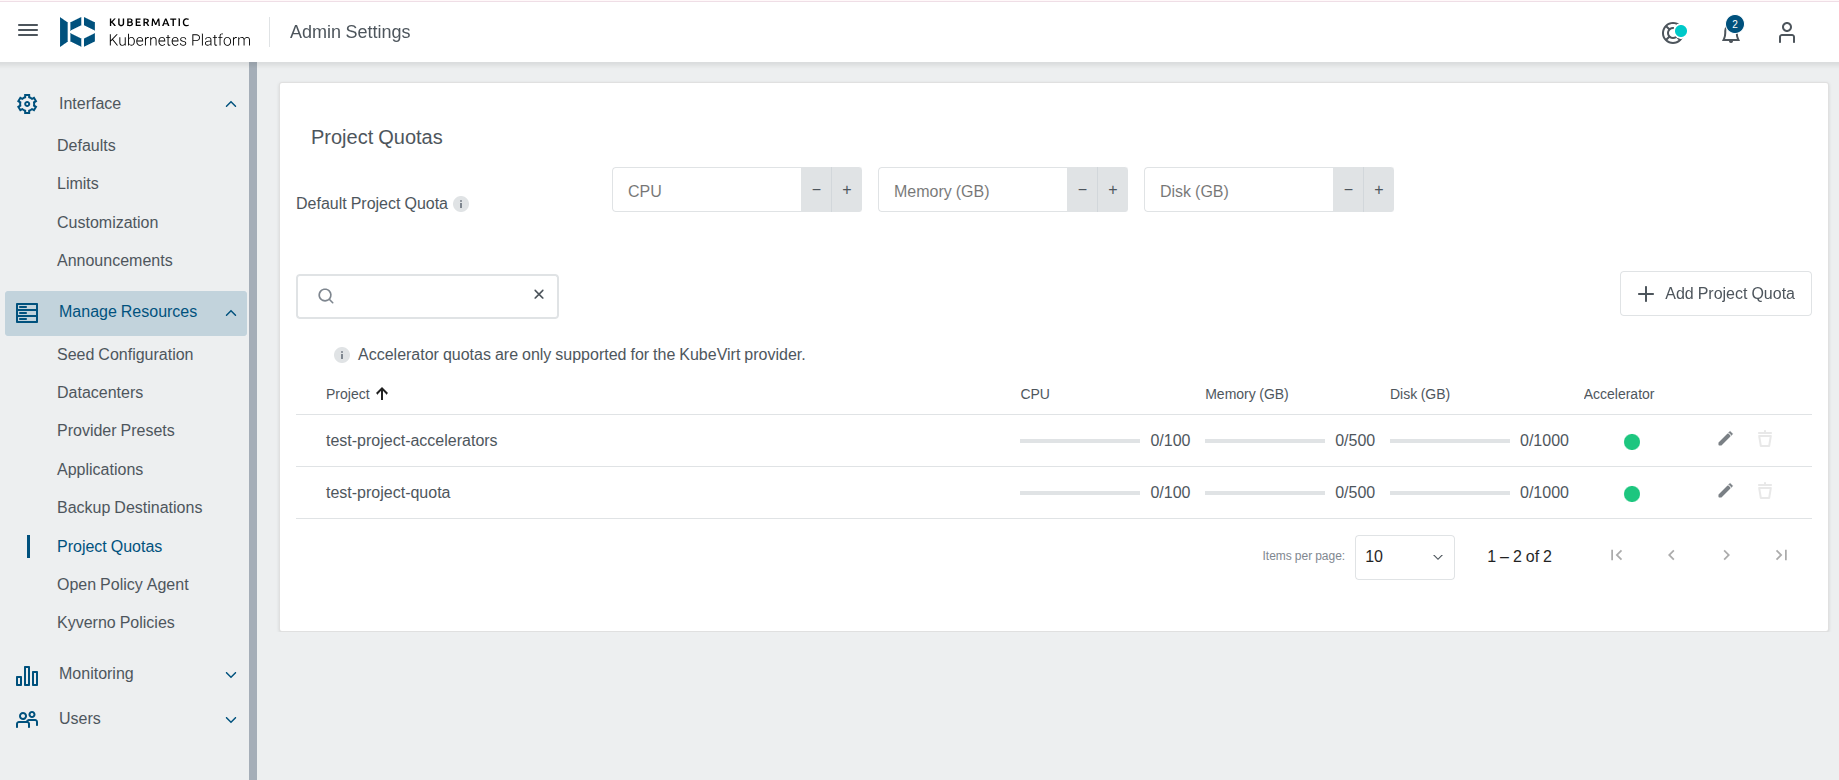
-
Once the status is
Ready, select the quota’s edit (pencil) action again and add the accelerator name and its limit in the Accelerators section. The only supported provider iskubevirt, and the accelerator name must exactly match the qualified, case-sensitive KubeVirt device name.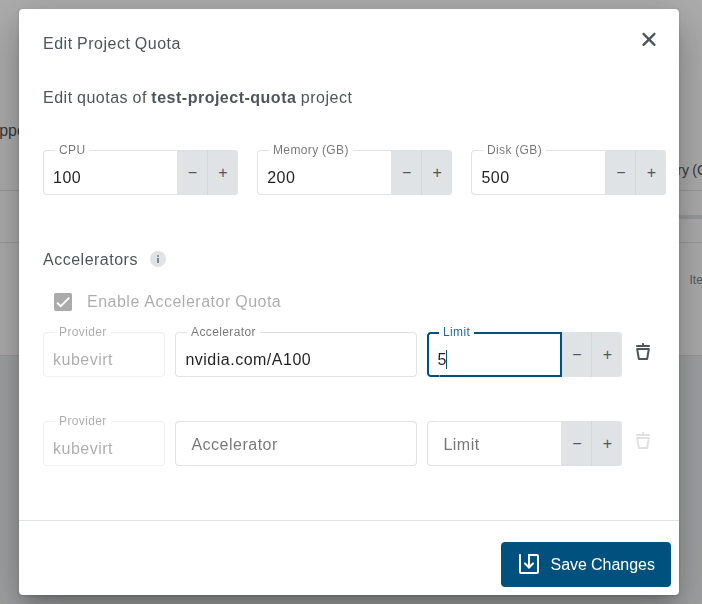
Repeat the quota creation and activation separately for every project that should use accelerator quotas. The project quota widget then shows the accelerator usage and limits alongside CPU, Memory and Disk.

Use kubectl
With the KKP master cluster kubeconfig, find the quota by Project ID and set its name:
PROJECT_ID="tjqjkphnm6"
kubectl get resourcequotas.kubermatic.k8c.io \
  -l "subject-name=${PROJECT_ID},subject-kind=project"

RESOURCE_QUOTA_NAME="project-tjqjkphnm6"
For a default quota, remove the default label in a separate update:
kubectl label resourcequotas.kubermatic.k8c.io "$RESOURCE_QUOTA_NAME" \
  kkp-default-resource-quota-
Activate accounting:
kubectl annotate resourcequotas.kubermatic.k8c.io "$RESOURCE_QUOTA_NAME" \
  accelerators.kubermatic.io/accounting-enabled=true
Verify Activation
Wait until the Dashboard shows the Accelerator status as Ready, or check it with:
kubectl get resourcequotas.kubermatic.k8c.io "$RESOURCE_QUOTA_NAME" \
  -o jsonpath='{.status.globalAcceleratorAccounting.activationPhase}{"\n"}'
The expected result is Ready. If the phase is Blocked, inspect the reported blockers:
kubectl get resourcequotas.kubermatic.k8c.io "$RESOURCE_QUOTA_NAME" -o yaml
Existing KubeVirt Machines created before activation may need to be recreated before accounting becomes Ready.
Configure Accelerator Limits
After accounting is Ready, update the existing ResourceQuota so its spec.quota includes the accelerator limit. Preserve its
existing CPU, memory, and storage values:
spec:
  quota:
    cpu: "100"
    memory: 500G
    storage: 350G
    accelerators:
      - provider: kubevirt
        resources:
          nvidia.com/TU104GL_Tesla_T4: "4"
The alpha API accepts one provider entry: kubevirt. Each resource key must exactly match the qualified, case-sensitive
deviceName used by the KubeVirt GPU or host device. Quantities must be non-negative whole numbers:
- A positive value sets the project-wide limit for that device name.
- Zero denies new Machines that request that device.
- An omitted provider or resource name is unconstrained; the map is not an allowlist.
If a Machine selects an instancetype, it must resolve to a live, named v1beta1 VirtualMachineInstancetype or
VirtualMachineClusterInstancetype. A Machine without one receives an empty footprint. revisionName and instancetype inference
from a volume are not supported.
Changing limits starts a new accounting revision.
Readiness and Lifecycle
Usage is stored in status.globalUsage.accelerators, readiness and blockers are stored in
status.globalAcceleratorAccounting. Inspect both with:
kubectl get resourcequotas.kubermatic.k8c.io "$RESOURCE_QUOTA_NAME" -o yaml
Activatingmeans KKP is waiting for reports for the current revision.Readymeans all required reports are compatible and fresh.Blockedincludes details instatus.globalAcceleratorAccounting.blockers.
With non-empty limits, new KubeVirt Machine CREATE requests fail closed unless accounting is Ready.
The annotation cannot be removed or set to false, disabling the feature gate does not
deactivate the project, and the ResourceQuota cannot be deleted while its Project exists and is not terminating.
To stop limit enforcement while keeping accounting active, set spec.quota.accelerators: [].
Accelerator accounting records requested Machine intent. It does not discover physical devices or install GPU operators, drivers, device plugins, or KubeVirt permitted host devices. The concurrent Machine creation race described below also applies because admission does not reserve usage atomically.
Some Additional Information
Note: If multiple nodes are created at the same time there is a possibility of a race happening and the quota being exceeded. As an example, there is a quota which CPU is filled 3/5, a user creates a cluster with 2 nodes, both using 2 CPU. There is a possibility of a race happening between calculating and adding the quota for the first machine and the second machine being created. So the end result could be that both nodes get created, and the quota ends up exceeded 7/5. This is planned to be fixed in the next KKP releases.
If the quota is exceeded, be it due to the quota being set on a project with active clusters, or due to a race, this feature will just block new Machines from being provisioned, it won’t clean up/remove cluster resources to get below the quota. This is something that should be agreed upon between the KKP admin and users.
The storage quota just affects the local node storage. It doesn’t monitor various provider PV that users can provision.
The quotas don’t support external clusters.
The quotas won’t restrict the usage of resources for the control plane on the seed cluster.
Nodes which join the cluster using other means than through KKP are not supported in the quotas.
Default Project Resource Quotas
It is possible to set the default resource quota for all projects which do not have a quota already set.
In the KKP’s KubermaticSettings globalsettings resource, there is a field in spec.defaultQuota through which
default project resource quotas can be managed:
apiVersion: kubermatic.k8c.io/v1
kind: KubermaticSettings
metadata:
  name: globalsettings
...
spec:
  defaultQuota:
    quota:
      cpu: "2"
      memory: 35G
      storage: 127G
If the spec.defaultQuota is set, a controller will create a default ResourceQuota for all projects which do
not have a ResourceQuota already. And if the field is updated, the default ResourceQuota’s will be updated as well.
Unsetting this field will delete all the default ResourceQuotas.
To distinguish a ResourceQuota from a default ResourceQuota, the label "kkp-default-resource-quota": "true" is set on the
default ResourceQuotas. To mark the ResourceQuota as non-default, just remove the label. When a default ResourceQuota is
edited through the UI/API, this will be done automatically.
Accelerator limits cannot be configured in spec.defaultQuota. They must be configured on an explicitly managed project
ResourceQuota after accelerator accounting has been activated and has become ready.